
Blender tutorial: use a Driver to link wheel rotation to the body’s movement, so 4 wheels turn automatically as the body moves.
Overview #

Flow: [1] Create 4 wheels → [2] Create the body (cube) → [3] Add a driver to 1 wheel → [4] Copy the driver to the other 3 wheels → [5] Parent the wheels to the cube
Remarks: Equivalent to an ‘expression’ in After Effects.
Step 1: Add cylinder #
How: Shift-A → Mesh → Cylinder
Step 2: Scale & rotate cylinder as wheels #
How: R-Y-90 (rotate 90) → R-X-0.2 (thinner) → S-0.5 (smaller)
Step 3: Apply change #
How: Ctrl-A Scale, Rotation


Step 4: Apply checker texture #
How: Material properties → New → Base Color → click yellow dot → checker texture → shader to preview



Step 5: Duplicate and position wheels #
How: keypad-7 (top view) → select wheel → Shift-D (duplicate) → G-Y / G-X (move)

Step 6: Add and position cube #

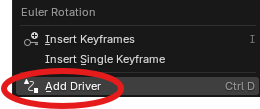
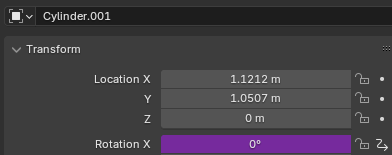
Step 7: Add driver #
How: Select 1 wheel → object properties panel → Right click Rotation-X → Add driver → Field becomes purple
Step 8: Edit driver → link up with cube Y Location #
How: Right click purple field → Edit driver → click on Object field → Choose Cube on pull down menu → Type: Y Location

Step 9: Correct wheel rotate direction #
How: Select wheel → Right click purple field → Edit driver → Driver Property → Expression → var * -1

Step 10: Apply driver to all 4 wheels #
How: Right click purple field → copy driver → choose each of the other wheels → right click Rotation-X field → paste driver

Step 11: Make wheels and cube move together #
How: select 4 wheels → select cube → Ctrl-P (Parent)
